
Interpolate: to insert between fixed points.
How after affects decides about what happens between keyframes.
(the dotted curved line shows this)
There are different ways to manage the change between the key states.
The default way after effects decides is by using a bezzea curve.

We can change this using the pen tool.

Anchor point are called vertex in after affects.
Convert vertex tool converts a smooth point to a corner point.


This can be reversed to create a curved path.
Spatial: the space occupied within the window
Temporal: how it occupies time
Select a keyframe.

Allows you to change what happens before and after keyframe.

Change spatial interpolation into linear, creates same effect as pen tool...


You can do this to all keyframes in composition.
When working with position 'temporal interpolation' makes a difference. It won't with effects such as opacity.
Create more keyframes

Select all keyframes and go to 'keyframe interpolation'

Change keyframe so that it becomes a 'HOLD' keyframe. This means there is no interpolation... there is no change between keyframes.


No dot along motion path. (a dot normally represents the number of frames between keyframes ...the more dots the slower it moves)
Keyframe symbol changes along timeframe to represent a hold keyframe.


Layer remains at that position until next keyframe when playback.
Applications of hold keyframes: animate the second hand on a clock.
(jump from second to second), blink, flash on and off.
Using the opacity keyframe to make the 'blink' letterfrom blink....

Right click a keyframe and select 'toggle hold keyframe' to quickly create hold keyframe.


Select keyframes and hold ALT, drag fist or last keyframe to make the whole sequence to happen quick/slower ...change PACE. You can compress/expand a number off different layers by simply selecting them.
Equally space keyframes to create a smooth motion.
Select all key frames APART FROM the first and the last (change type of keyframe to get smooth motion between first and last point)


Default setting is fixed to the time you specified.
Select 'rove' across time ...the keyframes will then space themselves out equally across the first and last keyframe.

Keyframes change to dots.
Use first or last keyframe to move the keyframes across time.
They are positioned in time according to the first and last keyframe.
This is only available for spatial properties (NOT temporal properties)
//Using Illustrator Artwork to create Motion Paths


Copy and paste shape

make key frame for POSITION property and paste


Shape now becomes the path for the object.
It becomes a roving keyframe.
Select layer


A layer mask/clipper mask in Illustrator or Photoshop: transparent/opacity


Mask transformations...


You can animate each one of these....


Reveal...
Create rectangle bounding box around text.
Create key frame for 'mask path' for beginning and end.

Move bounding box to cover word at first keyframe.


Last keyframe all is revealed.


Select 'M' to reveal all 'mask path'

Keeping all layer selected, moved the anchor points of different letterforms to make it look as though its melting.


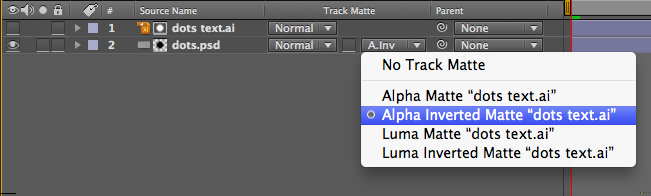
Matte.
Using one layer to specify which part of another layer you can see.
(Text on top of dots)


...this gives you three options
Choose the type of 'matte'


Dots text layer is the turned off...
You can invert this...


Photoshop layer much bigger than composition...


Apply text over it.


No comments:
Post a Comment